This post will cover setting up OpenClaw in a Home or Home Lab Linux environment. This is a continuation in the series of setting up OpenClaw as a personal assistant.
There are different ways in which you can deploy OpenClaw for this use case:
- Deploy within a VM or LXC in your home.
- Deploy remotely in a VPS or other hosted infrastructure, separated from your home network.
- Deploy as a service within your existing Desktop or Home Server.
Of these, the second one is ruled out if you want OpenClaw to truly be a personal assistant. A personal assistant works best when it has access to your environment (your home network and devices and services in it). Of course, you want to control this access and be careful in how it is granted, but putting it on a VPS defeats the purpose here IMO.
Deploying in a VM or LXC is definitely a good option. However, it does complicate communication and access control. Specifically, you will need to setup some way of allowing access to services to and from the VM to the rest of your machine/networks. It also increases the friction for interacting with the OpenClaw deployment from your native environment as you deploy and tinker with it (which is pretty much going to be constant IME). However, this is a more secure deployment approach than running OpenClaw on the machine natively.
The easiest and relatively secure option is the following:
- Create a dedicated, unprivileged user for running the OpenClaw gateway.
- Setup the OpenClaw as a user level service (systemd unit) that runs under this user account.
This approach restricts the access that OpenClaw gateway has and reduces the friction in setting up access to services that you want to host. Additionally, the services you host for OpenClaw (including MCP servers) can just bind to localhost without needing to worry about the potentially increased network exposure from them.
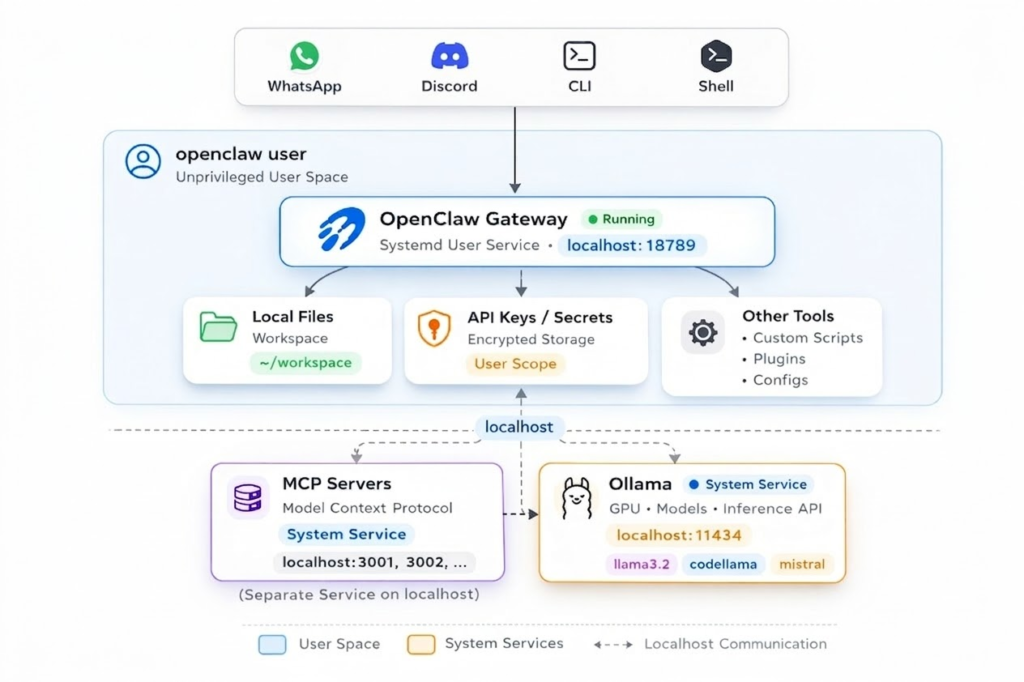
Here’s a simplified system diagram of the deployment and how it interacts with different services:
Setting up an unprivileged user account
sudo adduser openclaw
sudo usermod -s /sbin/nologin openclaw
This will setup an unprivileged user for running openclaw and disable login for that user. In order to act as that user, you will need to run sudo -u openclaw /bin/bash which will open an interactive shell as that user.
After opening the shell, follow the instructions for installing OpenClaw (and any node dependencies + node/nvm). Run openclaw from the shell to setup the initial configuration and confirm everything works. After this we are ready to set this up as user service that runs under the openclaw user account.
Verify OpenClaw is working
Open http://localhost:18789 in a browser – you should see the OpenClaw gateway interface. If you don’t see it, double check the port number. Finally, send a message from a configured channel (WhatsApp, Discord, etc.) and confirm that OpenClaw receives it and responds. If the gateway is up but you’re not getting replies, the issue is usually the channel configuration rather than the service itself.
Setting up a user service for OpenClaw
Create /home/openclaw/.config/systemd/user/openclaw-gateway.service (adjust path and other values to match your install/needs). The PATH environment variable is just AI spew – so just trim it to what is useful for your environment. The security & sandboxing section is useful – this prevents OpenClaw from gaining new privileges and restricts some of its access (unfortunately AF_NETLINK is needed because OpenClaw at startup always tries to figure out the local IP address):
[Unit]
Description=OpenClaw Gateway
After=network-online.target
Wants=network-online.target

[Service]
ExecStart=/home/openclaw/.nvm/versions/node/v24.13.1/bin/node /home/openclaw/.nvm/versions/node/v24.13.1/lib/node_modules/openclaw/dist/index.js gateway --bind loopback --port 18789
Restart=always
RestartSec=5
KillMode=process

# --- Security & Sandboxing (Safe for User Services) ---
NoNewPrivileges=yes
RestrictAddressFamilies=AF_UNIX AF_INET AF_INET6 AF_NETLINK
RestrictRealtime=yes
# ------------------------------------------------------

Environment=HOME=/home/openclaw
Environment=TMPDIR=/tmp
Environment=PATH=/home/openclaw/.nvm/current/bin:/home/openclaw/.local/bin:/home/openclaw/.npm-global/bin:/home/openclaw/bin:/home/openclaw/.volta/bin:/home/openclaw/.asdf/shims:/home/openclaw/.bun/bin:/home/openclaw/.fnm/current/bin:/home/openclaw/.local/share/pnpm:/usr/local/bin:/usr/bin:/bin
Environment=OPENCLAW_GATEWAY_PORT=18789
Environment=OPENCLAW_SYSTEMD_UNIT=openclaw-gateway.service
Environment=OPENCLAW_SERVICE_MARKER=openclaw
Environment=OPENCLAW_SERVICE_KIND=gateway
Environment=MCPORTER_CONFIG=%h/config/mcporter.json

[Install]
WantedBy=default.target
This sets up the systemd user service unit for OpenClaw. In order to make sure that this service will run automatically, you will need to enable it and also enable linger for the user so it starts automatically on reboot. Without linger, the user service does not run when the user is not logged in:
systemctl --user daemon-reload
systemctl --user enable --now openclaw-gateway.service
sudo loginctl enable-linger openclaw
Checking and Debugging the service
You can check if the service is running via: systemctl --user status openclaw-gateway.service
You can look at the logs for the service in the system journal via: journalctl -r _SYSTEMD_USER_UNIT=openclaw-gateway.service
In future posts we will cover setting up model providers, including local model support via Ollama.