One of my long-standing projects has been to have Asterisk running on my home network so my services have PSTN (and potentially SMS) access. In this post, I will cover the setup of Asterisk as a home lan pbx with voip.ms setup as the SIP trunk.
VOIP Providers
While there are many VOIP providers, I like voip.ms. Their service is not the easiest to configure, setup and use for a simple home phone service. However, their service is reliable, well built once you understand the concepts and cost effective.
Why Asterisk and not FreePBX
FreePBX is a good option if you want a managed UX for a complex PBX. However, I wanted to understand the basics and also with the help of AI build my own custom UX for my PBX down the line. For me, the goal is not getting a basic phone service – I already have a Grandstream ATA and home phones that handle that part with my voip.ms account. My goal is eventually have programmatic access to PSTN and I would like to use Asterisk REST Interface (ARI) and Asterisk Management Interface (AMI) to enable these.
Network Diagram
Here’s a network diagram of the final setup I wanted to achieve
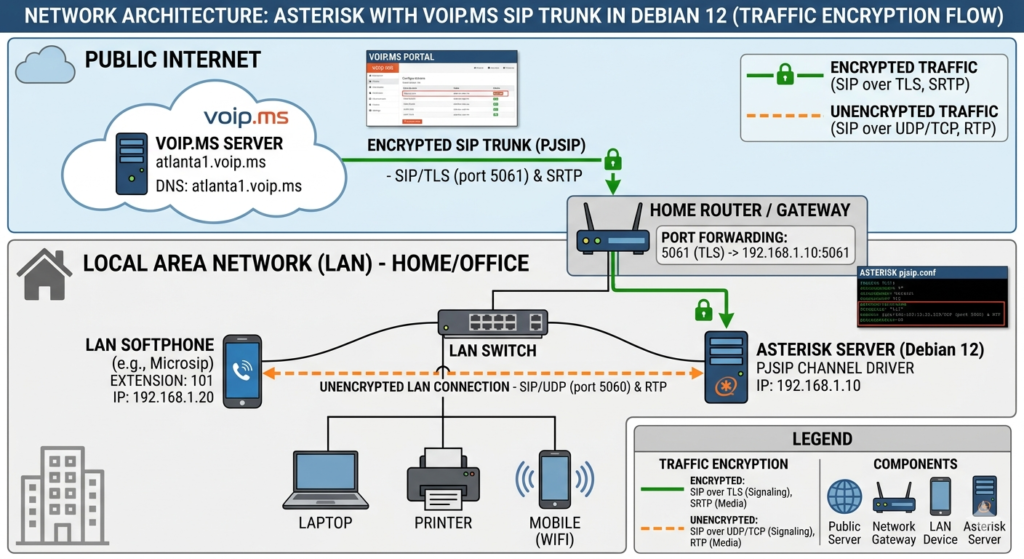
Setup Environment
I chose to run Asterisk as a LXC on my proxmox server. I decided to place it in my IoT VLAN. Asterisk is a fairly large attack surface, so placing it in my IoT VLAN and isolated from my other devices works for me. My management VLAN has full access to this VLAN – so any other services that need access to ARI or AMI will be able to reach it. I set the LXC up with a static IP on my Unifi gateway.
Installation
Instead of building packages from source, I decided to use Sangoma’s packages on Debian 12. As of FreePBX 17, Sangoma now uses Debian as its underlying Operating System so this works well.
First we create the user and group for asterisk, add Sangoma repo and install Asterisk and key dependencies:
# Create asterisk user before installing
addgroup asterisk
adduser --system --ingroup asterisk asterisk

# Add Sangoma repo
apt-get update
apt-get -y install gnupg software-properties-common wget
wget http://deb.freepbx.org/gpg/aptly-pubkey.asc
gpg --dearmor --yes -o /etc/apt/trusted.gpg.d/freepbx.gpg aptly-pubkey.asc
add-apt-repository -y -S "deb [ arch=amd64 ] http://deb.freepbx.org/freepbx17-prod bookworm main"
apt-get update

# Install Asterisk and required packages
apt-get -y install asterisk22 asterisk22-core asterisk22-configs asterisk22-odbc

# Install key dependencies
apt-get install -y libxslt1.1 liburiparser1 libsrtp2-1

# Install some sound files
apt-get install -y asterisk-sounds-core-en-ulaw asterisk-sounds-extra-en-ulaw

# Install troubleshooting tools
apt-get install -y bind9-dnsutils nmap tcpdump

# Add a home directory for asterisk user (optional)
usermod -d /home/asterisk asterisk

# Change ownership of directories to asterisk user/group
chown -R asterisk:asterisk /etc/asterisk /var/{lib,log,spool}/asterisk /usr/lib/asterisk

# Modify config to run asterisk as user/group asterisk
sed -i 's/;runuser/runuser/' /etc/asterisk/asterisk.conf
sed -i 's/;rungroup/rungroup/' /etc/asterisk/asterisk.conf

# Enable and run the service
systemctl enable asterisk
systemctl start asterisk
At this point, you should have a working asterisk service that does not do much. You can check using systemctl status asterisk.service or ps aux | grep asterisk | grep -v grep to see the status of the service and process details. Use the system logs to debug issues if the service does not run for any reason. Also, after this point, you should be able to run further commands as user asterisk instead of running as root.
Enable ARI and HTTP
ARI requires the HTTP server in Asterisk, which is disabled by default. Edit /etc/asterisk/http.conf:
enabled=yes
bindaddr=0.0.0.0
bindport=8088
Then configure ARI credentials in /etc/asterisk/ari.conf:
[general]
enabled=yes
pretty=yes

[asterisk]
type=user
read_only=no
password=YOUR_ARI_PASSWORD
Restart the service (systemctl restart asterisk.service) and verify modules are loaded with asterisk -rx "module show like res_ari"
Setting things up at voip.ms
voip.ms uses subaccounts to allow you to register from different endpoints for the same number (DID). Each subaccount gets its own SIP credentials. This allows my Grandstream ATA to connect directly to voip.ms (no dependency on my Asterisk server) and other softphones to also connect directly. For Asterisk, I created a dedicated subaccount with the following settings (only the relevant ones are mentioned):
- Authentication Type: User/Password Authentication
- Device Type: Asterisk, IP PBX, Gateway or VoIP Switch
- CallerID Number: Use one of my DIDs (pick your DID)
- NAT (Network Address Translation): Yes
- Encrypted SIP Traffic: Yes
For incoming calls, you can create a ring group and set it as the target for your DID – then add the sub-accounts to that ring group. This allows the flexibility (and continued use of your DID) while you setup Asterisk by not having that sub-account in the ring group. Go to DID Numbers > Ring Groups and Create new ring group. Add relevant sub-accounts to the ring group along with the setting for time, number of rings. Now DID Numbers > Manage DID and Routing Settings, select Ring Group and pick the Ring Group you created.
Setting Up voip.ms SIP Trunk
Edit /etc/asterisk/pjsip.conf to add the following:
[transport-tls]
type=transport
protocol=tls
bind=0.0.0.0:5061
ca_list_file=/etc/ssl/certs/ca-certificates.crt
method=tlsv1_2
local_net=<lan-subnet>/24

[voipms-auth]
type=auth
auth_type=userpass
username=<sub-account userid>
password=<sub-account password>

[voipms-aor]
type=aor
contact=sip:<pop hostname>:5061;transport=tls

[voipms]
type=endpoint
transport=transport-tls
context=from-voipms
disallow=all
allow=ulaw
outbound_auth=voipms-auth
aors=voipms-aor
from_user=<sub-account userid>
from_domain=<pop hostname>
direct_media=no
rtp_symmetric=yes
force_rport=yes
rewrite_contact=yes
media_encryption=sdes
send_rpid=yes
trust_id_outbound=yes

[voipms-registration]
type=registration
transport=transport-tls
outbound_auth=voipms-auth
server_uri=sip:<pop hostname>:5061;transport=tls
client_uri=sip:<sub-account userid>@<pop hostname>
retry_interval=60

[voipms-identify]
type=identify
endpoint=voipms
match=<pop hostname>
pop hostname is the pop server you picked for your DID in voip.ms (check DID > Manage DID > Edit Settings > DID Point of Presence). Please note that much of the settings under [voipms] have been setup to work correctly behind a NAT with your Asterisk server running on a LAN address behind your router. In particular, rtp_symmetric, direct_media, force_rport, rewrite_contact settings are relevant here. Also, these settings setup an encrypted SIP connection as well as enable encrypted calls via SRTP.
Restart the service (systemctl restart asterisk.service) and check that registration is successful with asterisk -rx "pjsip show registratons”. If everything worked, you should see voipms show as Registered. At this point, you are ready to test basic outbound calling using this SIP trunk.
Testing basic outbound calling
Edit /etc/asterisk/extensions.conf and add the following:
[general]
static=yes
writeprotect=no

[default]
exten => s,1,Answer()
 same => n,Playback(demo-congrats)
 same => n,Hangup()

[from-voipms]
exten => s,1,Answer()
 same => n,Playback(demo-congrats)
 same => n,Hangup()

[outbound]
exten => _1NXXNXXXXXX,1,NoOp(Outbound call to ${EXTEN})
 same => n,Dial(PJSIP/${EXTEN}@voipms)
 same => n,Hangup()
Now restart the service and test an outbound call to another number (like your cell):
systemctl restart asterisk.service
asterisk -rx "channel originate PJSIP/1XXXXXXXXXX@voipms application Playback demo-congrats"
If everything worked, you should get a call on your cell and when answered you should hear something like “Congratulations, you have successfully installed and executed asterisk”.
Setting Up Local SIP Endpoints
Now that we have the basic SIP trunk with voip.ms working with Asterisk, we can start setting up local SIP endpoints – these would be how endpoints connect to the Asterisk server and we can wire them up to receive/make calls via the SIP trunk we setup. I setup my local endpoints in a separate file /etc/asterisk/pjsip_extensions.conf and then #include pjsip_extensions.conf in /etc/asterisk/pjsip.conf. Here’s what the extension configuration looks like:
; The Local Endpoint
[100]
type=endpoint
context=from-internal
disallow=all
allow=ulaw
auth=100-auth
aors=100
rtp_symmetric=yes
rewrite_contact=yes
force_rport=yes
direct_media=no

; The Authentication Credentials
[100-auth]
type=auth
auth_type=userpass
password=<password for asterisk user>
username=<username for asterisk user> ; I just used 100

; The Address of Record
[100]
type=aor
max_contacts=5
remove_existing=yes
minimum_expiration=60
default_expiration=120
Now, you can use this information configure local softphone clients. Since I use a Linux Desktop, I tried three different clients – they all are good. A brief description of my experience with each below:
- Linphone – Configuration took a bit of effort. The UX isn’t great. Getting audio working took some work as it enabled SRTP by default which I don’t support in my local Asterisk server.
- Zoiper – The easiest to setup. Pretty much everything worked once the basic account setup was done.
- Jami – Configuring a SIP account is not obvious from the UI, but you can read the documentation to figure it out. Once setup, also uses SRTP by default and needs adjustment if that’s not supported. Do not install as a flatpak or snap – this leads to frustrating issues with permissions. I just installed the Debian/Ubuntu package and it worked fine.
Have a client configured and verify that you can sign-in using the SIP account you setup on your Asterisk server.
Configuring Outbound And Inbound Calls From Local SIP Endpoints
Next, we can configure the outbound and inbound calls through the SIP trunk from our Local SIP endpoints. Modify your /etc/asterisk/extensions.conf to add the following:
[default]
exten => s,1,Answer()
 same => n,Playback(demo-congrats)
 same => n,Hangup()

[from-voipms]
exten => <Your DID>,1,NoOp(Inbound call - Name: ${CALLERID(name)} - Num: ${CALLERID(num)})
 same => n,Set(CALLERID(name)=${IF($["${TOLOWER(${CALLERID(name)})}" = "wireless caller" | "${CALLERID(name)}" = "unknown" | "${CALLERID(name)}" = ""]?${CALLERID(num)}:${CALLERID(name)})})
 same => n,Dial(${PJSIP_DIAL_CONTACTS(100)},30)
 same => n,Hangup()

; Catch-all safety
exten => _X.,1,Dial(PJSIP/100,30)
 same => n,Hangup()

[outbound]
exten => _1NXXNXXXXXX,1,NoOp(Outbound call to ${EXTEN})
 same => n,Set(CALLERID(num)=<Your DID>)
 same => n,Set(CALLERID(name)=<Your Name>)
 same => n,Dial(PJSIP/${EXTEN}@voipms)
 same => n,Hangup()

[from-internal]
; Match 10-digit numbers (e.g., 5555551234)
exten => _NXXNXXXXXX,1,NoOp(Outbound call to ${EXTEN})
 same => n,Set(CALLERID(num)=<Your DID>)
 same => n,Dial(PJSIP/${EXTEN}@voipms)
 same => n,Hangup()

; Match 11-digit numbers (e.g., 15555551234)
exten => _1NXXNXXXXXX,1,NoOp(Outbound call to ${EXTEN})
 same => n,Set(CALLERID(num)=<Your DID>)
 same => n,Dial(PJSIP/${EXTEN}@voipms)
 same => n,Hangup()

; Allow dialing extension 100 locally (for future use)
exten => 100,1,Dial(${PJSIP_DIAL_CONTACTS(100)},30)
 same => n,Hangup()
With this dialplan, your local SIP endpoints should now be able to both make outbound calls through the voip.ms SIP trunk as well as receive inbound calls made to your voip.ms number.
Debugging Tools
If something is not working, run the following and repeat the scenario to get logs and then figure out what went wrong. AI can be helpful in figuring out the problem:
asterisk -rvvv
pjsip set logger on